Create a Vignette Effect
How do I create an effect to make my images look "old"?

Sometimes your images may benefit from removing or toning down distracting backgrounds. Perhaps enhancing the main subject a little and this is where vignetting comes in. In this tutorial, we will be using Adobe Photoshop.
I mention looking "old" above because very early cameras had this effect naturally.
Page updated January 2018: Please note that most software such as Lightroom and smartphone apps have the ability to do this with one click since writing this. It doesn't hurt to still learn how to create vignettes manually. By doing so, you have more control over how the final image looks.
Anyway, you have probably seen the effect on old sepia images (or images made to look old) and noticed how it made the subject stand out. It is actually quite a simple process, but then isn't everything once you know how to do it?
Two points to make before I show you the process; firstly, don't overdo it! If you do, the image will look ridiculous and too obvious that you have overdone it. Secondly, it is all too easy to add vignetting to all of your images. Save it for the ones that need it or would benefit from it.
What you want is an image that appears as though the viewer is seeing an old image. Or almost "spying" on the subject through an aperture like a keyhole or binoculars.
Ok. How to create a vignette effect
Open your image fully and select the "elliptical marquee" tool (fig.1). Click and drag the size of oval or circle that you want around the subject. Don't worry if you can't get it in exactly the right place, just get the right size. "Unclick" and now you can click in the centre of the selection and move it into place.

Create a Vignette Effect Fig. 1
You now have the centre of the image, including your subject, within the selection, you need the outside. Go to select (fig.2) and select inverse, or simply right click on the image and select inverse that way. Now you can adjust and darken the surrounding area outside of the selection.

Create a Vignette Effect Fig. 2
If you were to darken the area now, you will end up with a pin sharp line between the adjusted and non-adjusted areas. We need to blur, smudge or "feather" the selection. This will make the adjustments look more gradual and pleasing to the eye.
Feathering
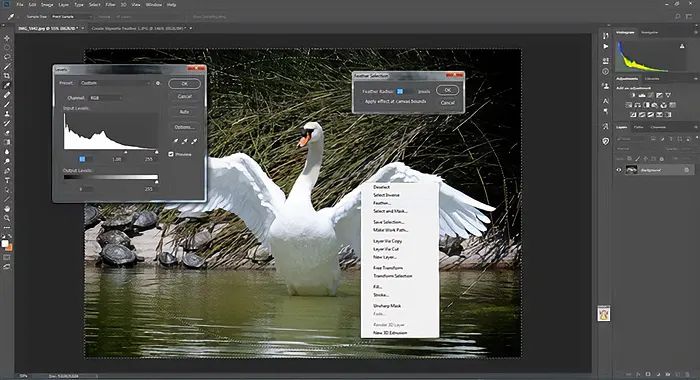
Right click in the image, or go to select in the menu, and select the "feather" option. This will bring up a new box as in the top right section of fig.3, in which you must choose the radius or amount of feathering you require. For now, set it to 200 pixels and press OK.

Create a Vignette Effect Fig. 3
Now go to Image - Adjustments and select the levels tool which you will use to darken the contrast around the selected area. Move the left, black slider towards the centre of the line as shown in fig.3 above. If you have the "preview" button checked, you will see the vignette appear as you do this. Find a suitable level for your image and leave it at that.
Don't overdo it like I have possibly done here, "deselect" the area and save your new image remembering to keep the original.
You can add other effects such as sepia toning to enhance the aged look, but for now, I hope that this adds to your knowledge of Photoshop effects.

Create a Vignette Effect Fig. 4
